XAUUSD Sell Setup: How We Hit TP1 and TP2 on a Clean Supply Zone Rejection

# The Setup
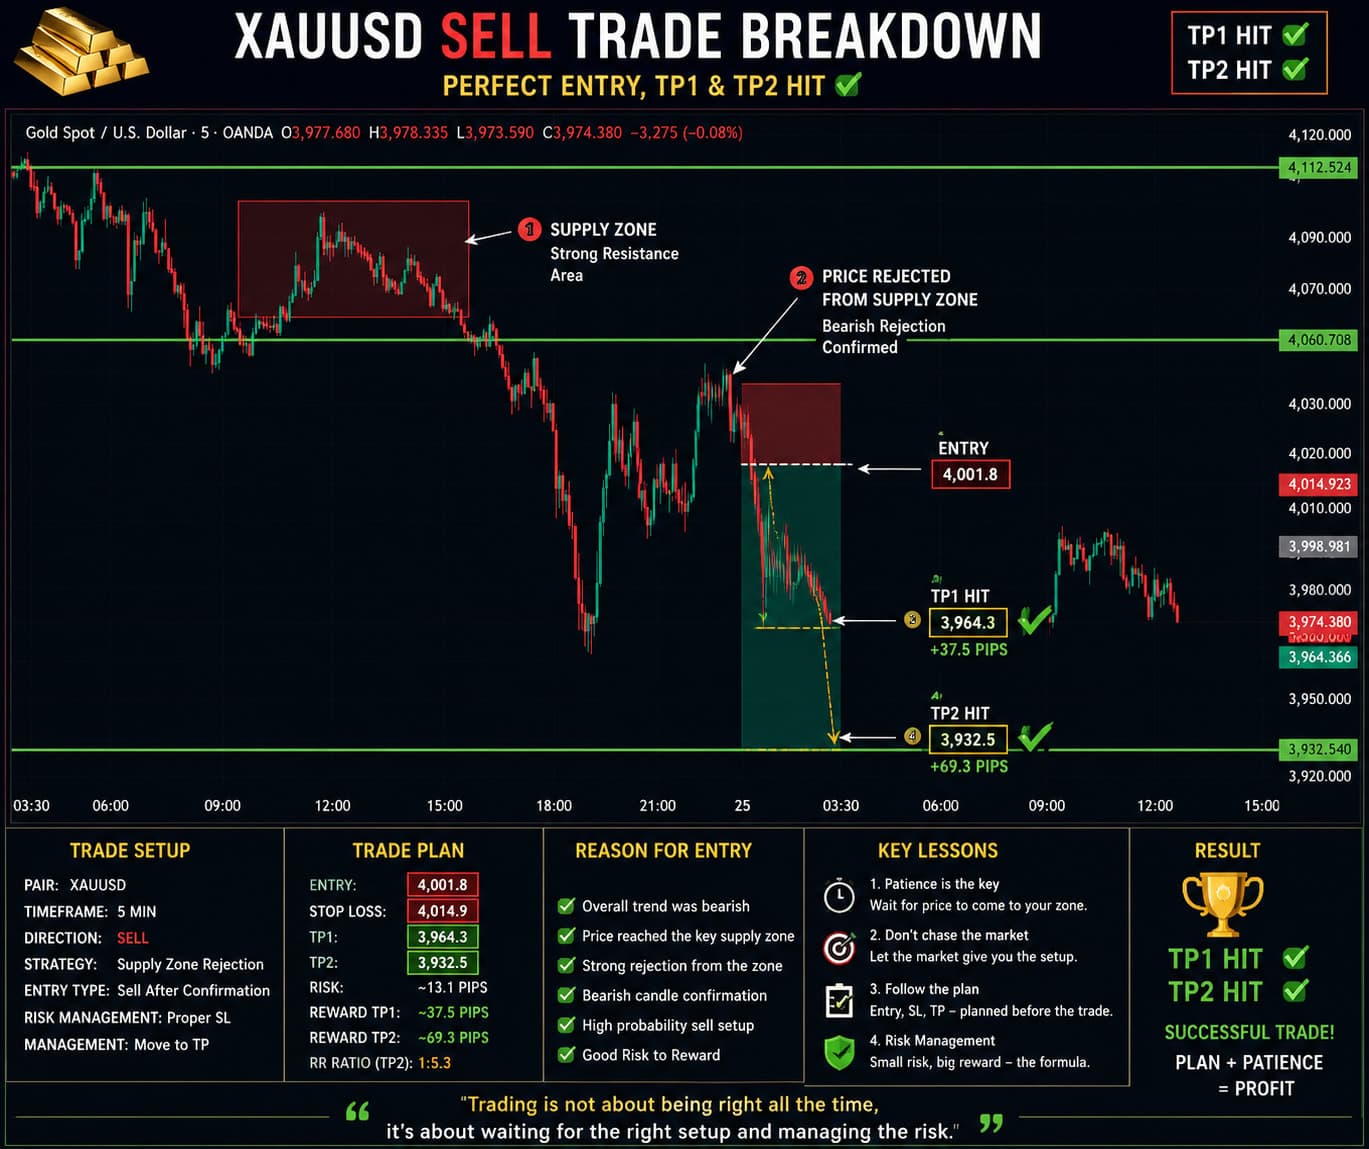
Gold wasn't kind to impatient traders in the last move. XAUUSD rallied hard to 4012, but instead of chasing the top, we waited. We marked a supply zone at 3997-4001 and planned to enter only when price came back with proper confirmation and rejection.
This trade hit both targets. Here's exactly what happened and why it worked.
## Part 1: Understanding the Market Bias
### The Bearish Landscape
Before marking any entry, we had to answer one question: What is the market really doing?
Price was making lower highs and lower lows—textbook bearish structure. Sellers were in control. But here's the key: we didn't sell from the bottom. That would've been emotional.
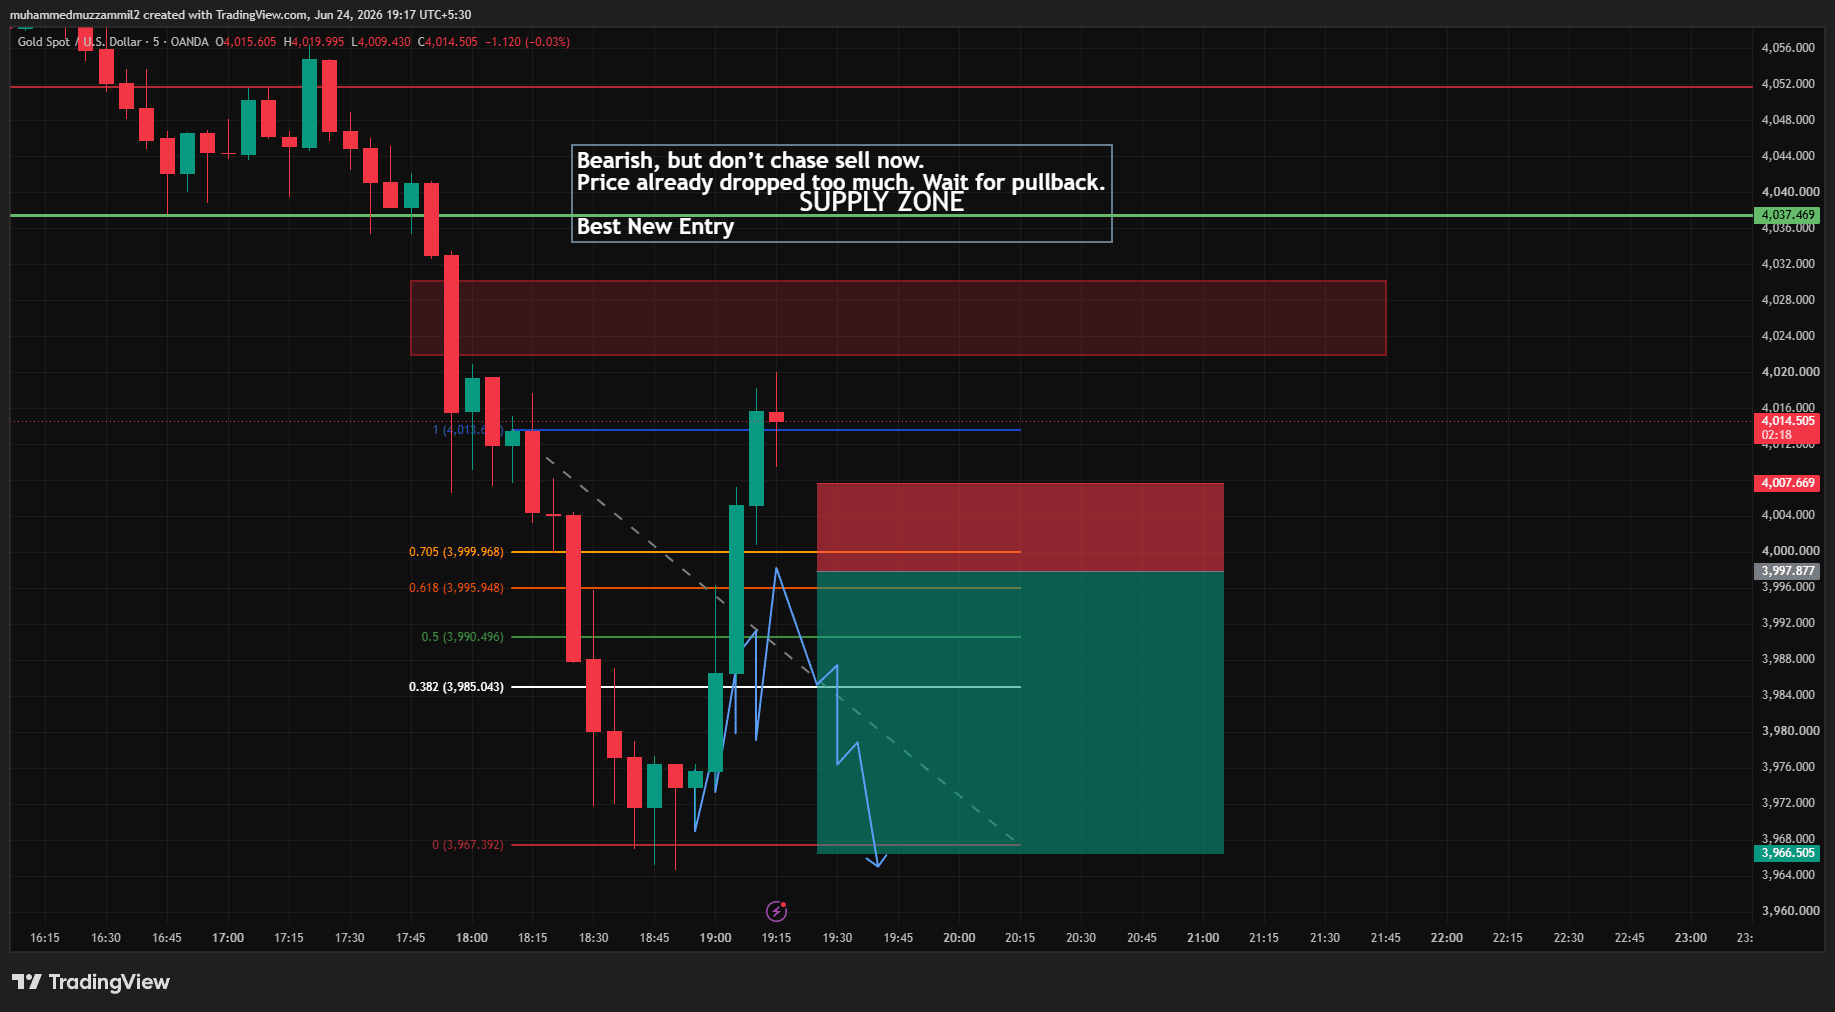
Instead, we recognized that after a strong upward rally, price would pull back. That pullback into our marked zone was our entry opportunity.
### Why Waiting Mattered
Many traders would have shorted immediately when price dropped from 4012. That's how you get stopped out on pullbacks. The professional play was different:
- Strong upward rally happened (to 4012)
- Market pulled back into our supply/resistance zone (3997-4001)
- We waited for rejection from that area
- Only then did we enter
This is patience, not hesitation.
## Part 2: The Supply Zone—Where Sellers Showed Up
### Identifying the Rejection Area
We marked our sell zone around 3997-4001—a level where price had already faced rejection before. In SMC terms, this is a supply zone that previously held as resistance and was tested with bearish confirmation.
This zone was not random. It came from:
- A previous higher high that failed at 4012-4014
- Seller rejection from the 3997-4001 area
- A level where buyers couldn't hold strength
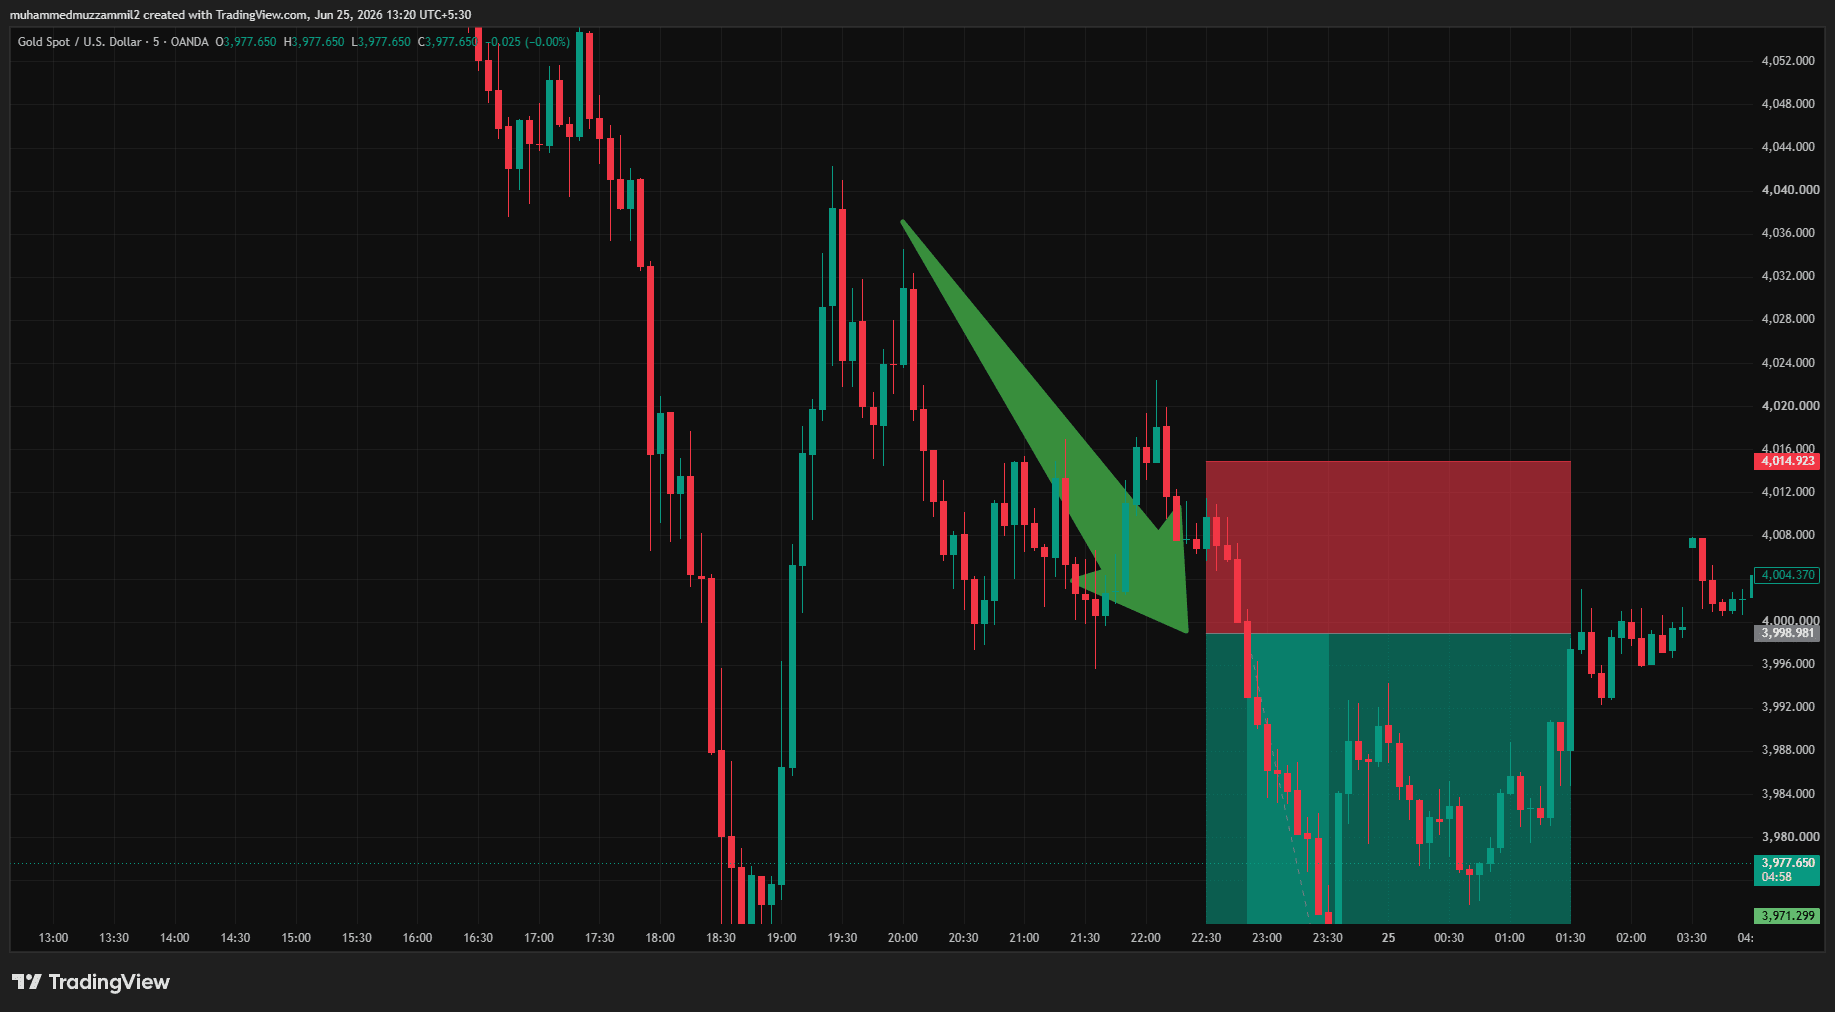
### Price Returns to the Zone
After the initial rally to 4012, price pulled back down—right into our marked zone at 3997-4001. This is exactly what we expected. The pullback wasn't climbing above supply; it was testing it.
## Part 3: The Entry—Rejection Confirmation
### What Confirmed the Sell
We didn't enter randomly. We waited for rejection. Here's what we saw:
1. Price reached the supply zone (3997-4001) — Buyers stepped in, trying to push higher
2. Sellers pushed back — A bearish reversal candle formed, showing weakness
3. Momentum turned bearish — Price failed to sustain above the zone and declined sharply
The rejection was clean. No ambiguity. Price tested the zone and failed.
### The Entry Logic
Pair: XAUUSD
Bias: Bearish (Lower Highs, Lower Lows)
Entry Type: Sell Setup
Entry Reason: Supply zone rejection with bearish confirmation
Trade Plan (Set Before Entry):
- Entry: 3997.5 (Supply zone rejection)
- Stop Loss: 4007.5 (10 pips above entry)
- Target 1 (TP1): 3977.5 ✅ HIT
- Target 2 (TP2): 3971.5 ✅ HIT
The targets were calculated with risk-to-reward in mind. We knew our exit points before we pressed the sell button.
Risk Management Setup:
- Risk: 10 pips
- Reward (TP1): 20 pips
- Reward (TP2): 26 pips
- Ratio: 1:2 to TP1 | 1:2.6 to TP2
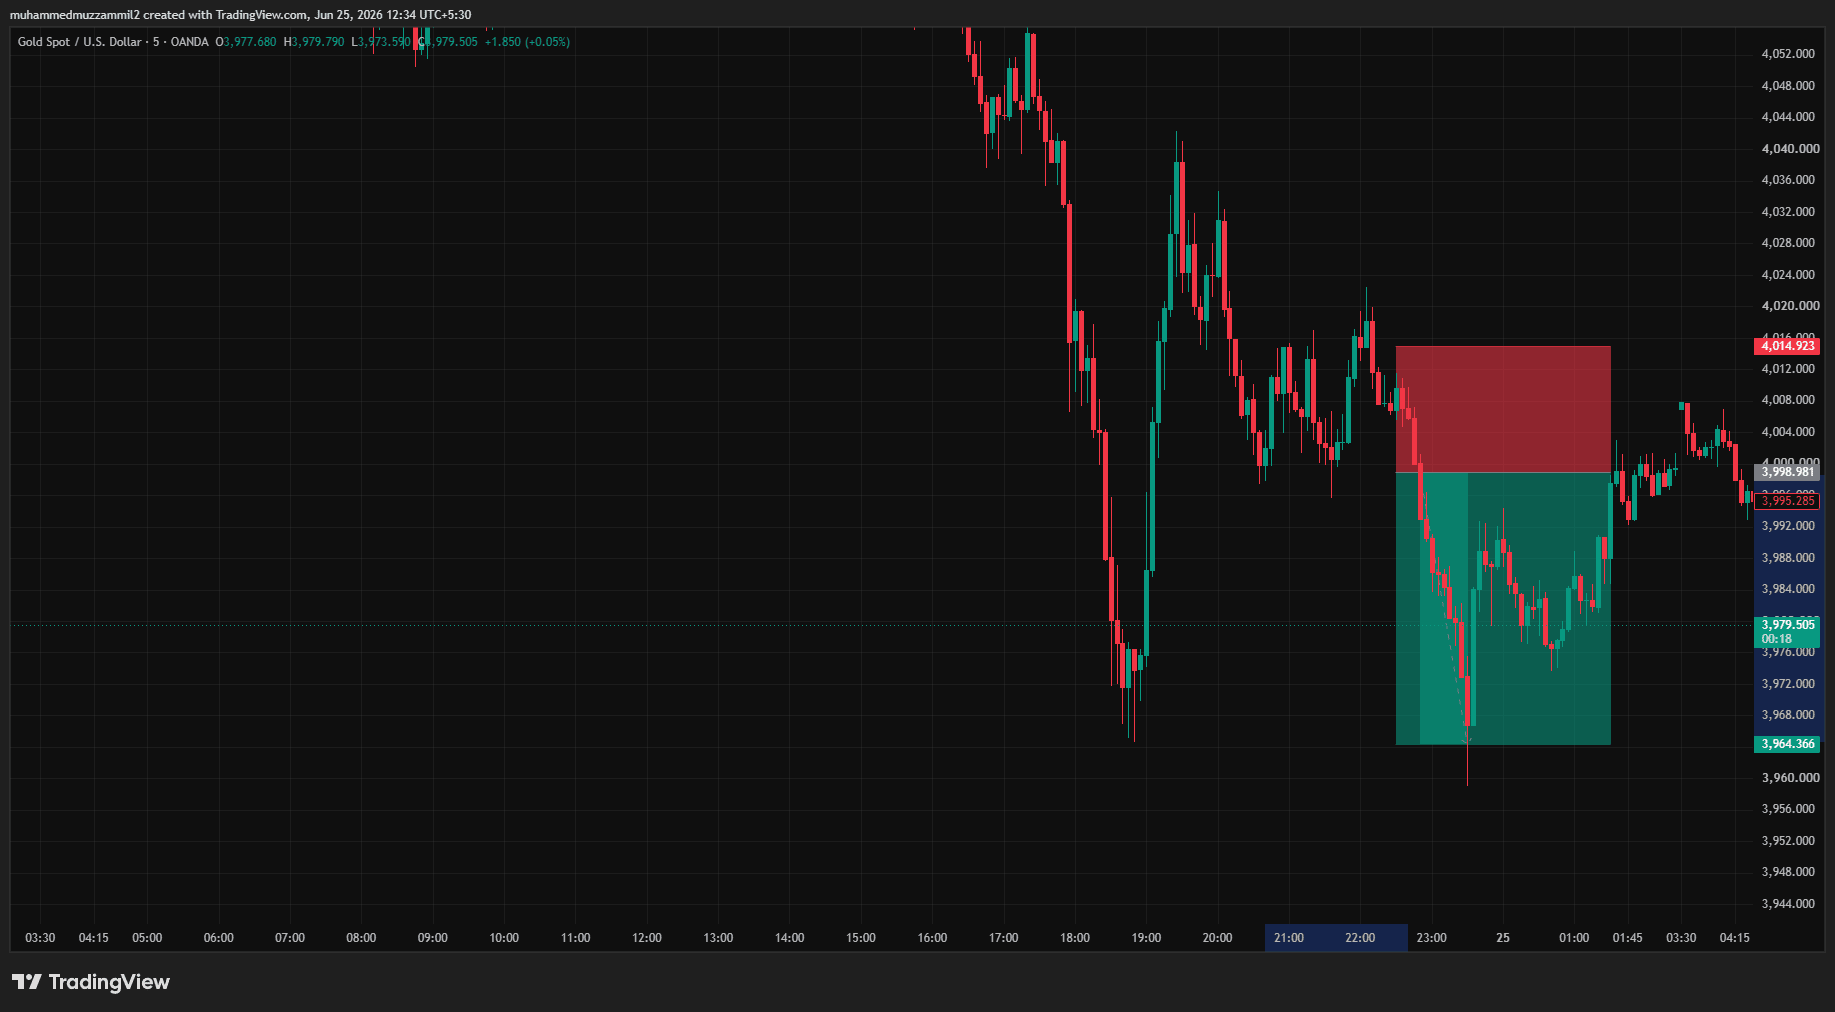
[INSERT CHART 3 HERE: Show entry at 3997.5, SL at 4007.5, TP1 at 3977.5, TP2 at 3971.5 clearly marked with zones]
## Part 4: Why This Entry Worked—The Confirmation Checklist
This trade worked because all confirmations aligned:
✅ Price reached the planned zone (3997-4001) — We got our setup area, not on emotion but on price action
✅ Rejection formed at resistance — Price failed at 3997-4001, confirming sellers were still in control
✅ Bearish momentum returned — After rejection, price moved decisively downward toward targets
✅ Both targets achieved — Price hit TP1 at 3977.5 and TP2 at 3971.5 without surprise reversals
### The Real Lesson
This wasn't luck. It was a planned trade based on:
- Market structure (Lower highs from 4014 → 4012)
- Supply zone identification (3997-4001 as previous resistance)
- Entry confirmation (Rejection candle, not hope)
- Risk management (Stop loss and targets set before entry)
## Part 5: Risk Management—The Part That Separates Winners
Here's what separates profitable traders from the rest: Every trade has a plan before entry.
Before we pressed the sell button, we knew:
- Where we would enter: 3997.5
- Where we would stop if wrong: 4007.5
- Where we would take profit: 3977.5 (TP1) and 3971.5 (TP2)
Risk was controlled. We weren't gambling; we were executing.
### The Trade's Risk-to-Reward Breakdown
Risk: 3997.5 to 4007.5 = 10 pips
Reward to TP1: 3997.5 to 3977.5 = 20 pips (1:2 ratio)
Reward to TP2: 3997.5 to 3971.5 = 26 pips (1:2.6 ratio)
This means even if we lose 3 trades out of 5, we still profit because wins are 2-2.6x bigger than losses.
The Math:
- 3 losses × 10 pips = -30 pips
- 2 wins × 20 pips = +40 pips
- Net Result: +10 pips profit
This is why risk management matters more than win rate.
## Part 6: What You Can Learn From This Trade
### The Core Principles
1. Patience Is Your Best Tool
Most traders would have shorted immediately at 4012 or chased down from 4008. We waited for the zone and confirmation. This trade worked because we didn't rush.
2. Wait for Confirmation, Not Just Setup
The setup (pullback to 3997-4001) wasn't the entry. The entry was the rejection at that zone. Confirmation separates winning trades from false signals and stop-outs.
3. Risk Must Be Managed Before Entry
Stop loss at 4007.5 and targets at 3977.5 and 3971.5 were decided before we entered. You can't manage risk after you're in a trade.
4. Emotion Has No Place
This trade wasn't exciting. It wasn't a "rocket ship" move. It was methodical, boring, and professional—exactly what makes it profitable.
### The Mindset Shift
Stop thinking like:
- "I need to catch the entire move from 4012 to 3971"
- "I should sell NOW before it goes higher"
- "Let me add more size since I'm winning"
Start thinking like:
- "Where is my supply zone?"
- "What rejection candle confirms the setup?"
- "Can I afford to lose 10 pips on this trade?"
- "Is a 1:2 reward-to-risk worth my capital?"
## The Results
XAUUSD Sell Setup | Supply Zone Rejection
Entry: 3997.5
TP1: 3977.5 ✅ HIT
TP2: 3971.5 ✅ HIT
Status: Closed at target
Risk:Reward: 1:2
## Final Thought: Trading Is Waiting
This is the quote we live by at FXfolder:
> "Trading is not about taking every move. Trading is about waiting for the right move."
You don't win by being busy. You win by being selective.
This XAUUSD trade is proof. We:
- Waited for the zone (3997-4001) ✅
- Waited for confirmation (rejection candle) ✅
- Took the trade with proper risk (1:2 ratio) ✅
- Booked profit when targets hit (both TP1 and TP2) ✅
- Didn't chase or overtrade after success ✅
If you're entering without a marked zone, chasing moves, or adding size when winning—you're working against the market. Flip the script. Be patient. Be systematic. Let the market come to you.
## Ready to Learn This Framework?
At FXfolder Classes, we teach SMC trading from basics to execution—everything from identifying supply/demand zones to managing risk on live trades like the one above.
This isn't theory. It's the exact framework we use on real trades. Entry zones, confirmation patterns, risk-to-reward management—all live.
## Keep Up With Live Signals
Want to see setups like this before they happen? Join our FXfolder Community for:
- Live trade alerts and entries
- Real-time market structure analysis
- Trading breakdowns every week
Disclaimer: This analysis is for educational purposes only. Past performance is not indicative of future results. Always practice proper risk management.
Educational content only. Not investment advice.